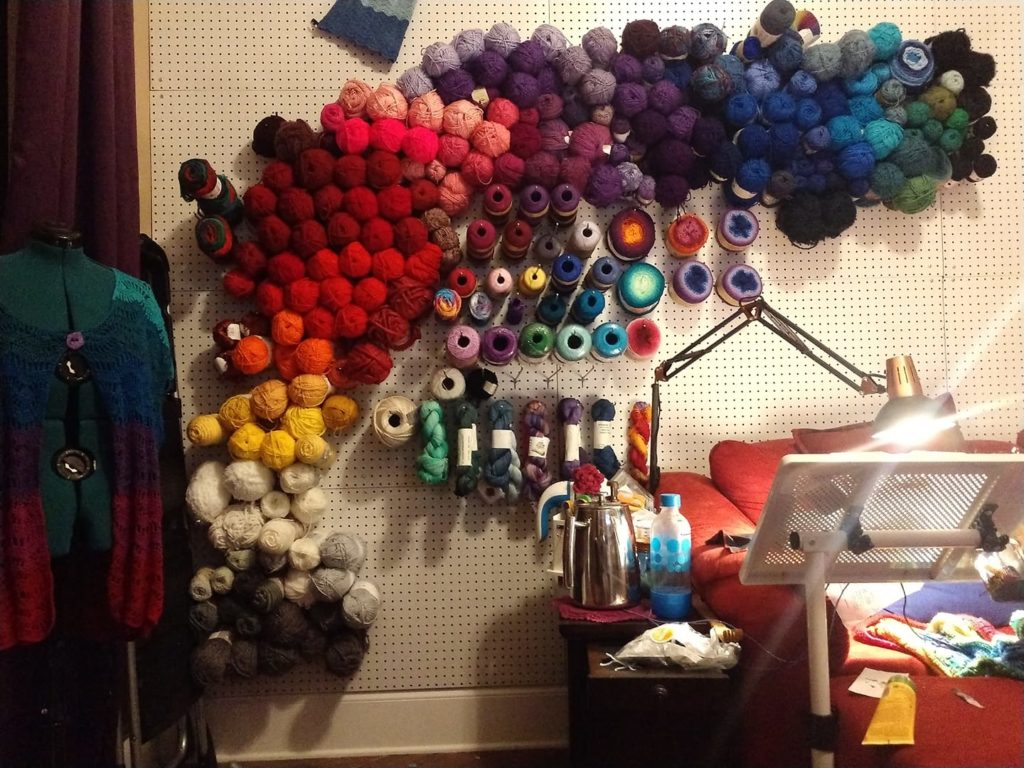
While I’ve been working at organizing my massive yarn stash, I’ve also been working on setting up an area to video my tutorials. This is far more complicated than I expected! Lighting! Cameras! Open Space! Background! So many things to think about.

It’s still in progress, but I’ve set up a desk/table to work on. I started with just my laptop but quickly figured out that my laptop doesn’t have enough USB ports to handle two cameras and a microphone, so my son set about building a video computer while I worked on the other details.

First, my video camera. I had this grand idea that my cell phone and my laptop video cameras would be sufficient. Um, no. They were dark and grainy and just not what I wanted. So, I researched and hit a good sale and bought 2 of these bad boys.

Logitech HD Pro Webcam C920

So, now I had a camera, but how do I film my hands? I can mount the camera on the back of my monitor, but that only gets my face. So, now what?

Neewer Adjustable Desktop Suspension Boom Scissor Arm Stand Holder with Base

I liked that so much I bought another one for my face cam. So one for my face and one for my hands. But, still it’s kind of dark, so what next?

VILTROX L116T CRI95+ Super Slim Dimmable LED Light Panel

I need two of these, one on each side of me. This lit up my table area pretty well too. They need to be put on stands so two more of my Boom Scissor Arms. Check. And I could go with rechargeable batteries, but who has time for that? So, I bought these. It should be noted that the first set of power supplies I bought for these were the wrong voltage and the lights barely turned on. So, read the description carefully!

12V DC Power Supply 2A 24W Adaptor

But, there’s something not right about the lighting. I’m not a pro, so I researched some more. Apparently I need a “hair light”. That will help soften the light, reduce the shadows on my face (and man were there shadows on my face!) and help illuminate my background a little bit. But, I don’t want it to show up so I chose one with a boom arm which sits off camera and aims the light in the right direction.

YISITONG 135W Professional Photography Softbox Lighting

So, now that I’m broke, lol. I can get started shooting some videos. Watch for those soon! I have a whole series planned. 300 stitch patterns, basic stitch instruction, pattern explanations, I’m really excited to share all of this with the world!

I have been working furiously behind the scenes trying to organize my overly massive yarn stash. You know the type – a few boxes here, some bags of yarn stored in my bedroom closet, some baskets full in the living room, unfinished objects stored here there and everywhere – it’s totally out of hand!

Back in January, I decided that everyone else in my home had their own space and I deserved some too! I’m the mom, after all. Why am I the last to have a space of my own? So, I set about cleaning out the chaos that was our “game room”. It was full of unused homeschool supplies, various items that nobody knew what to do with, and lots of video games that my son played in there. With his help, we whittled down the mess and I was able to create a nice living space in there. I like it a lot! But, so does everyone else, lol, so the space mom set up for herself is also communal. Isn’t that the way it goes?

But, I’m getting more serious about getting my business started and that meant phase 2 kicked into high gear after the conference. There isn’t a lot of storage space in this room and all the floor space is taken up by the big comfy sofa and my desk so I had to get creative.

Enter pegboard!

I covered the one big wall that has no windows or doors with pegboard. 10 pieces of 2×4 foot pegboard, to be precise. It is a hugely versatile storage solution and I encourage you to consider too. Best part, it’s affordable! And modular so you can build it as you need it!

Just a couple more to go!

Once the wall was in place, I started with one hundred 4 inch hooks. They hold about 1 ball each. Anyone know how long that lasted? About 2 hours before I realized I needed a lot more.

Now some people get all tidy and wind each ball on their winders, but who’s got time for that! I decided to go with a more lackadaisical method – hang it the way it is. So some is hung as balls, some as cakes, some as skeins, some as hanks. I didn’t get too hung up on color perfection either. I did mostly an arc that follows the colors of the rainbow but there’s room for expansion at the top and bottom. The result is a beautiful piece of wall art that gets all my yarn where I can see it for inspiration.

Not totally finished but all the yarn from one room is managed!

Want to build your own? Here’s a quick list of all the supplies I used:

4 inch hooks – the vast majority of my yarn is hung on these hooks. I can fit most medium balls and cakes on these hooks. I have purchased 350, but in the pictures on this post, I have only used about 250:

10 inch hooks – hold 3 small balls of thread, 2 large balls of thread, larger skeins of yarn like RHSS, or multiple hanks of yarn. I currently have 100 but will soon be ordering more:

50 total small plastic hooks in two shapes – these are to display finished projects and support my Yarn Vault sign. One package is all you need to do a wide variety of tasks.

12 inch hooks – these aren’t really necessary, but they hold large skeins of yarn slightly better than the 10 inch hooks. I’m only using a few here and there.

https://amzn.to/2Lkjld1

I’m currently nearing the end of my first official cable blanket and I have a feeling there will be many more of these in my future. I adore the geometry and complexity of the pattern and watching my concept come to life in yarn.

I’ve always enjoyed making cables. Both the variety of the stitch pattern and the magic illusion of the twisting vines of yarn keep my on my toes. I have previously designed a cable scarf that was very simple and another scarf with some cable like features, but the idea of a large scale blanket seemed years away. How do designers decide which stitch crosses where? How long should the stitch be? How do you keep everything consistent?

I figured these things out in (name of blanket here) and it was surprisingly easy.

I started with some graph paper and sketched out the pattern I wanted to see. I’m not skilled at drawing, so it had to be simple – connect the intersections was as much as I can muster.

My first draft. I started with pencil and as I “locked in” a shape, I traced over it with pen.

Once I was satisfied with the way things fit together, I scanned it and did some magic with photoshop and pieced together a full repeat with both beginning and ending sides and a couple of repeats in the middle.

My photoshopped mock up.

Great. Now what??? I have a bunch of lines on paper. How does that become a pattern? Which ones go on top and which go on the bottom? I still had more work to do.

This is where I got creative.

My blocking board with sturdy yarn pinned in place according to the pattern.

Okay, NOW I had something I can work with. I can play with the red yarn and place it over and under to make sure that everything continues in the right fashion. If one pair goes under in one section, it must go over in the next. So, I just pinned and repinned until it all worked out.

Now, I know there’s more to the math of this. I have to delve deeper into cables to understand this better, but I feel like I have a good handle on where to go from here.

I hope you enjoy the results! And, if you made it through all of this, kudos to you! Thanks for reading!

Work in progress, cable blanket made with Red Heart Hygge, Sterling

~Caroline