Up until about 5 years ago, I was exclusively a big box yarn user. I had my favorites, but I never really understood why anyone would pay more than $5 for yarn.

And then I got my first hank of ArtYarns Milano, a yarn distributed by the former Craftsy (now BluPrint, they no longer sell yarn). It was 100% merino wool and a sport weight. Two things I’d never worked with. I’d always thought of wool as scratchy and unpleasant. And sport weight seemed so tiny compared to the yarns I’d worked with before!

I fell in love. The shawl I made is still one of my favorites. It’s a basic pineapple lace shawl and I finally understood why my projects were so bulky and cumbersome before.

Yarn Matters. And, when you limit yourself to big box stores (like I did), you’re missing out on a world of fabulous yarn.

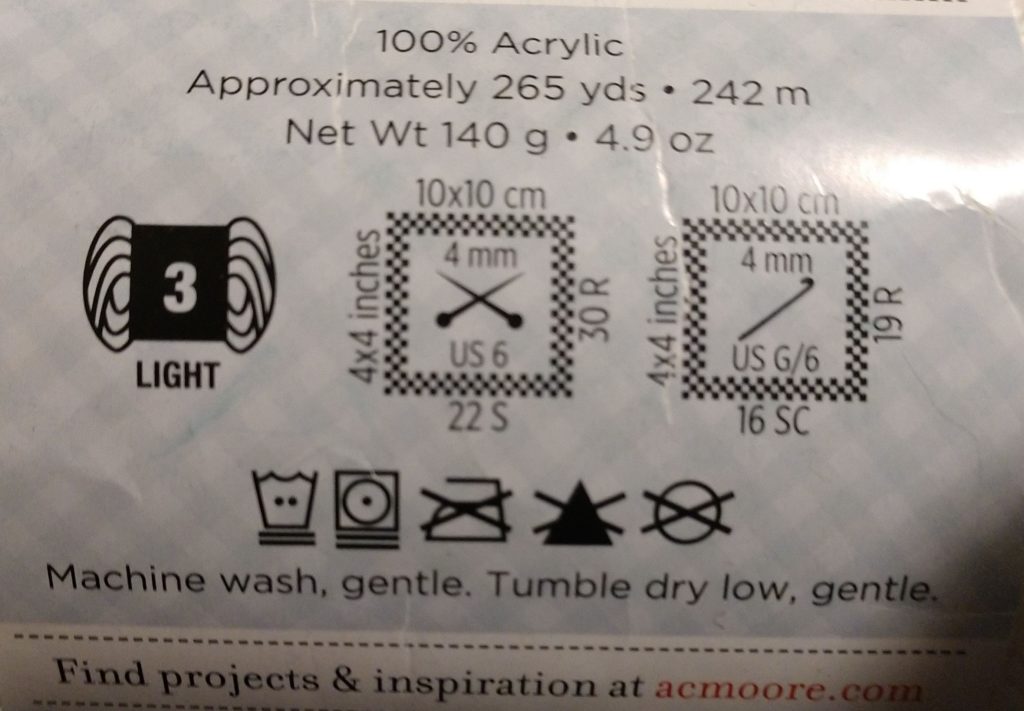
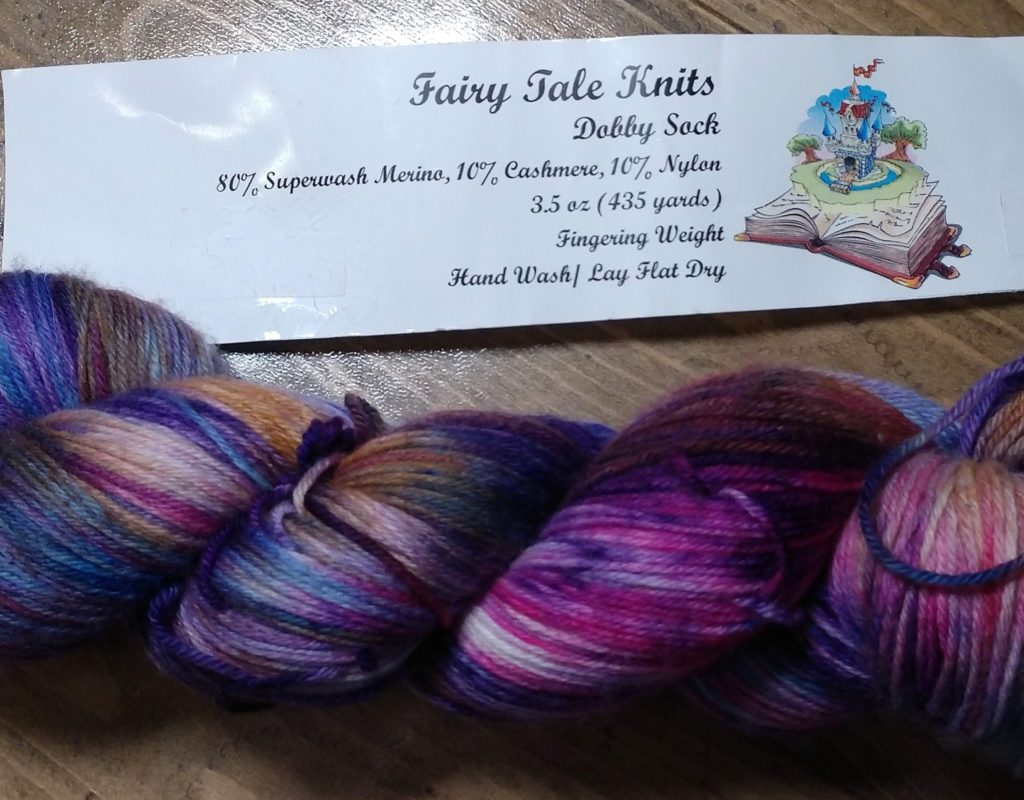
Don’t get me wrong, I still spend way too much money at Michael’s, JoAnns, AC Moore and occasionally Hobby Lobby. There is some great yarn available at these stores. Durable, colorful, easy to acquire… it definitely fills a need. But sometimes you want something special and unique. That’s where small yarn shops really come in handy.

Your local yarn store is a great resource for finding new yarns, new friends, new patterns, fun buttons, notions, all things yarn related. A lot of yarn shops have crochet and knitting groups that meet regularly too! My area has between 5 and 9 small shops (depends on how far you’re willing to consider “my area”). Every spring, all 9 participate in a “yarn crawl” event and I go around and visit them all. I normally set a small budget for each store to buy something little and do my part to support small businesses.

Does your area have a yarn crawl? Check it out if so! It’s a lot of fun!

There are many ways to join your yarn. I’ve tried a lot of them, but my preferred method is the Magic Knot. And once you know how to do it, you’ll see – it really is a little bit of magic!

Here are the overall steps to check out. Detailed instructions are below.

The amazing Magic Knot!

I like to use this anywhere I need to start a new strand of yarn. It works best with yarns and threads that are not slippery – acrylic, cotton, wools, anything that has a little bit of grab to it. A slinky, slipper yarn will come undone, however. So be sure to test your knot and yank on it HARD before moving on.

Step 1: Take your working yarn and lay it out with the end facing away from your work. Your new yarn will face the opposite of that direction. This might be different if you’re left handed, so switch them appropriately.

Step 2: You’re going to start making a regular knot, which is called an overhand knot, with your new yarn. You’re going to cross it OVER your working yarn and bring it back towards you under the working yarn.

Step 3: Make a loop AROUND your working yarn and pull the new yarn tail through, making sure that your tail continues in the same direction it started. (You can pull that knot tight at this point but I left it loose for this pictorial.)

Step 4: Start your second knot with your working yarn. You will cross this strand UNDER the new yarn.

Step 5: Close your working yarn knot AROUND the new yarn by bring your tail over the new yarn and through the loop you just made, making sure that the tail is facing the same way it started, opposite of the new yarn.

Step 6: Tighten your first knot if you haven’t already done so. And I mean REALLY tighten it. You want this nice and snug and I’ll tell you why in just a minute.

Step 7: Tighten the other knot if you haven’t already done so. Same goes with this knot. Tighten it HARD!

Step 8: Grab the tail of the new yarn in one hand, and the tail of your working yarn in the other and pull them towards each other. If you tied your knots correctly, this should be fairly easy to do. Once they’re touching, give them a really hard yank.

Now, here’s where the magic comes in. As long as you followed these directions precisely, your knots are facing in opposite directions. The harder they push against each other, the tighter they become. This doesn’t hold true on yarn that is slippery, which is why I recommend you always test it before moving on. But, I have been using this knot for years with great success! It makes a very small little bump in my yarn, but once the project is worked up, it’s barely noticeable! So, let’s finish this tutorial.

Step 9: Cut the tails. Don’t be afraid to cut them right up against the knot. As long as you don’t actually cut the knot, it will be secure. I promise!

Step 10: You’re done! Look at that beautiful knot! It’s secure, and barely noticeable.

Give it a try and let me know what you think!

Understanding what yarn a pattern uses

So you have a pattern you want to make but how do you decide what yarn to use?

The simplest, most reliable method is to stick to the yarn the pattern recommends. The designer made this pattern with a certain yarn in mind so if you use what they recommend, your results will be the closest to the finish product.

Let’s take a look at my Sea Turtle Baby Tank published in the April 2018 issue of I Like Crochet Magazine. Isn’t she precious? Don’t you love that little turtle on her shoulder?

I had summer babies in Florida. My kids rarely wore anything that wasn’t lightweight and breathable. So, I chose this yarn with that in mind. It’s soft for babies, and has an airy design. It drapes nicely, has good stitch definition but doesn’t stretch out and become misshapen with wash or wear.

In this image, you can see what the pattern says to use for the yarn. Now, you’re always free to use a different yarn, but when you use the yarn that a designer used, a lot of the work is already done for you.

Materials for Sea Turtle Baby Tank

In this pattern, I used Loops & Threads Woolike yarn. It’s an inexpensive yarn easily available at all Michael’s stores or online.

You can see that this is a Super Fine yarn, by the yarn symbol with a 1, as well as the words undernath Super Fine. This yarn only comes in 100gram balls, and you will need less than one ball for each colorway you use. It uses one each of Navy, Ice Blue, Tan, and Sage.

In the parenthesis after each color name, you see the abbreviations MC, CC1, CC2, CC3 used. Those tell you how the colors are referred to in the pattern. And, after the abbreviations, you see numbers like this 1(1,1,1)ball. This means that you use 1 ball to achieve each size.

And, that’s really it! If you want to substitute yarns, it gets more complicated, but we’ll discuss that when we go over gauge and sizing. That’s when things really get fun!

Keep on Hooking!

Reading Yarn Labels

Yarn labels come in many varieties. Some have tons of information and you just don’t know what to make of it, some has just the basics, and then most are somewhere in between.

Red Heart Soft label

Let’s start with this label by Red Heart. It’s their Soft line. We’ll talk about the quality and texture of this line in another post, so let’s just focus on the label here.

This is the main part of the label, the part that’s on display in stores. I’ve diagrammed the label below.

Red Heart Soft Label diagrammed

You can see the logo, the weight of the ball in both ounces and grams, the dye lot (there is none), the length of the ball in yards and meters, what size knitting needles are recommended in US terms and metric, and the name of the color.

But wait! There’s more!

Detailed Red Heart Soft Label with Symbols

This is the important part when it comes to care instructions. At the top we we see the yarn weight which we discussed here. And next to that we find the knitting and crochet information.

Yarn Gauge Symbol

There’s a lot of information in that little square! You know this is the one for crochet people because of the hook in the center of the square. I’ll go into more detail in another post, but for now let’s just discuss the information as it’s presented.

Across the top and on the left side you see the size of a square that you should make to determine gauge. On the right side is the number of rows you will need to make to achieve that size square, and on the bottom is how many and why type of stitches you make.

The center of the square is the recommended hook size in US terms and metrics. This is just a guideline though. You can use whatever size you need to achieve gauge, or if you want a different effect, you can also change the size. Crochet is art! You do what makes you happy.

Below that is the care and use information.

Care information

From the left, you see a wash symbol with a number and two lines under it. 80 represents a cool wash or sometimes you will see this as a single dot, 90-104 (or 2 dots) represent a warm wash, and anything over 130 (or 3 dots) represents a hot wash. The two lines under the wash symbol indicate a gentle cycle. If there are no lines underneath, you can use a regular cycle. When in doubt, always use cold water and a gentle cyclewith your handmade items! Or better, wash by hand.

Next to that is the dryer symbol, which follows a similar system – 1 dot is tumble dry on low heat, 2 dots is medium heat, and 3 is high heat. If you see an X over this symbol it means dry flat and do not put in the dryer. You might also see two lines under this symbol, which means a gentle cycle in the dryer. When in doubt, dry flat!

The next symbol is ironing. For this yarn, there is an X over the symbol which means do not iron. This symbol can also have the dots inside, which indicate low, medium, or high heat, as with the dryer.

The triangle represents bleach. It’s rare to find a yarn that can be bleached, so you will typically see that big X over the triangle. But, sometimes it will be an empty triangle which means bleach is safe, or it will have two black stripes inside which means non chlorine bleach, like oxy clean, only.

And the final symbol is for dry cleaning. A means any solvent, P means any solvent execept trichlorethylene, and F means petroleum solvent only. Again, this symbol might have an X which indicates it cannot be dry cleaned.

Fiber content

The final bit of information on this label is fiber content. This one is 100% Acrylic. This is important for a number of reasons. We’ll talk about different types of fiber, how they behave, and why you would choose them later in this series.

Okay! Here’s a couple other labels just to see other ways you might see yarn represented.

Loops & Threads Label

This is more compact. You see the logo, with the yardage and weight right below, followed by information for a pattern that is included on the label presumably. There is a crochet hook with the recommended size and that’s about it. The yarn content was listed on the back, with the care instructions.

This is also 100% acrylic. It’s a light weight yarn, size 3, and it’s recommended that you use a 4mm or USG hook. This can be washed in warm water on a gentle cycle, dried on low heat in a gentle dryer. It should not be ironed, bleached, or dry cleaned.

Here’s another one from a small yarn maker that I love. Frequently smaller companies have less information on their labels, but the important stuff is sill there!

This is from Fairy Tale Knits. It’s a blended yarn, with 80% Superwash Merino, 10% Cashmere, and 10% Nylon. It is 435 yards, and weighs 3.5 oz. The weight is Fingering, which we know from our chart is a SuperFine yarn, or will have a yarn symbol of 1 in some patterns. It should be washed by hand and laid flat to dry.

Whew! That was a lot of information. Hope it cleared things up and we will continue this series soon!

Craft Yarn Council Yarn Chart

So let’s talk about the thing that is overwhelming our houses, our thoughts, our hands…. Yarn! It comes in all colors, sizes, textures, shapes, even temperatures! So, what does it all mean?

First let’s look at the official chart from the Craft Yarn Council.

Source: Craft Yarn Council’s
www.YarnStandards.com

There’s a lot of information in that chart and it can be hard to understand when we don’t all use the same language. Craft Yarn Council has helped us out a lot by standardizing these terms as much as possible, but it’s not foolproof. Some manufacturers use different terms, most stick to these guidelines as much as possible.

Looking at the top of the chart, you see these symbols:

These symbols are generally on every yarn label you will purchase. Small manufacturers may not always use them, but any large manufacturer will have one of these symbols somewhere. The number in the center of the image should be consistent with the word in the top of the image. Jumbo yarn is 7, Fine yarn is 2, for examples. Unfortunately, these terms are not always consistent in all patterns. I follow the Craft Yarn Council’s guidelines, but not everyone does, especially when you’re dealing with international manufacturers. So, you will sometimes see the following terms in patterns:

So you can see that Lace weight yarn can also be called fingering yarn, or even crochet thread! But, then – even more confusing – Super Fine yarn is also sometimes called fingering yarn. These terms are not consistent, but we do our best to explain them as well as we can as designers. And there are people working to make this more consistent.

So, how do you know if the yarn you chose will give you the desired results from a project? Gauge! That’s a whole lengthy post in itself, but we’ll discuss it briefly.

What this means is that to create a 4 inch strip of single crochet stitches with , for example, Worsted Weight yarn, you will need between 11 and 14. To measure this accurately, I would recommend you chain 20 stitches, turn, and start single crocheting across starting with the second chain until you have 4 inches. This will undoubtedly curl, but do your best to lay it flat and measure. Note that with Fingering Weight yarn, it’s recommended to use double crochets.

Okay, so you want to do that, but how do you know what size hook to use?

Thank goodness, hook sizes are pretty consistent. And, most of them have a letter AND a metric size to help make sure you’re using the right size. The most reliable sizing is metric, but check both. Note that Fingering Weight is a little wonky here again – you might use one size in a steel hook (a special hook designed for using thread, mainly to make lace or filet) and another size in a regular hook.

So, hopefully that clears up any confusion about that chart. In future posts, we’ll break down yarn labels, what kind of fiber is good for what kind of project, why you choose one weight over another, and tons more!

UFOs, they’re everywhere.

My living room, my bedroom, my Yarn Vault. And before I can really get started publishing, I need to whittle down some of my UFOs or I’ll never get them done.

You know what I mean, right? Unfinished Objects. /sigh/ I hate having something unfinished, especially when I’ve been looking forward to using them when they’re complete. So, publishing is waiting a little bit until I finish the blanket I’m currently working on.

It’s quite lovely, actually. Lilla Bjorn’s Stained Glass Wonder Blanket. https://www.ravelry.com/projects/CarochetDesigns/stained-glass-wonder-blanket

Just a few more octagons and I will be done. And, then watch out! Lots of things in the wings to share with you!

Like a high collar capelet I can’t wait to show you! Little hint… it uses this gorgeous yarn in Rose Gold, Copper, and Onyx. https://us.deramores.com/products/rico-design-fashion-cotton-metallise?variant=812704989191

I have been working furiously behind the scenes trying to organize my overly massive yarn stash. You know the type – a few boxes here, some bags of yarn stored in my bedroom closet, some baskets full in the living room, unfinished objects stored here there and everywhere – it’s totally out of hand!

Back in January, I decided that everyone else in my home had their own space and I deserved some too! I’m the mom, after all. Why am I the last to have a space of my own? So, I set about cleaning out the chaos that was our “game room”. It was full of unused homeschool supplies, various items that nobody knew what to do with, and lots of video games that my son played in there. With his help, we whittled down the mess and I was able to create a nice living space in there. I like it a lot! But, so does everyone else, lol, so the space mom set up for herself is also communal. Isn’t that the way it goes?

But, I’m getting more serious about getting my business started and that meant phase 2 kicked into high gear after the conference. There isn’t a lot of storage space in this room and all the floor space is taken up by the big comfy sofa and my desk so I had to get creative.

Enter pegboard!

I covered the one big wall that has no windows or doors with pegboard. 10 pieces of 2×4 foot pegboard, to be precise. It is a hugely versatile storage solution and I encourage you to consider too. Best part, it’s affordable! And modular so you can build it as you need it!

Just a couple more to go!

Once the wall was in place, I started with one hundred 4 inch hooks. They hold about 1 ball each. Anyone know how long that lasted? About 2 hours before I realized I needed a lot more.

Now some people get all tidy and wind each ball on their winders, but who’s got time for that! I decided to go with a more lackadaisical method – hang it the way it is. So some is hung as balls, some as cakes, some as skeins, some as hanks. I didn’t get too hung up on color perfection either. I did mostly an arc that follows the colors of the rainbow but there’s room for expansion at the top and bottom. The result is a beautiful piece of wall art that gets all my yarn where I can see it for inspiration.

Not totally finished but all the yarn from one room is managed!

Want to build your own? Here’s a quick list of all the supplies I used:

4 inch hooks – the vast majority of my yarn is hung on these hooks. I can fit most medium balls and cakes on these hooks. I have purchased 350, but in the pictures on this post, I have only used about 250:

10 inch hooks – hold 3 small balls of thread, 2 large balls of thread, larger skeins of yarn like RHSS, or multiple hanks of yarn. I currently have 100 but will soon be ordering more:

50 total small plastic hooks in two shapes – these are to display finished projects and support my Yarn Vault sign. One package is all you need to do a wide variety of tasks.

12 inch hooks – these aren’t really necessary, but they hold large skeins of yarn slightly better than the 10 inch hooks. I’m only using a few here and there.

https://amzn.to/2Lkjld1